


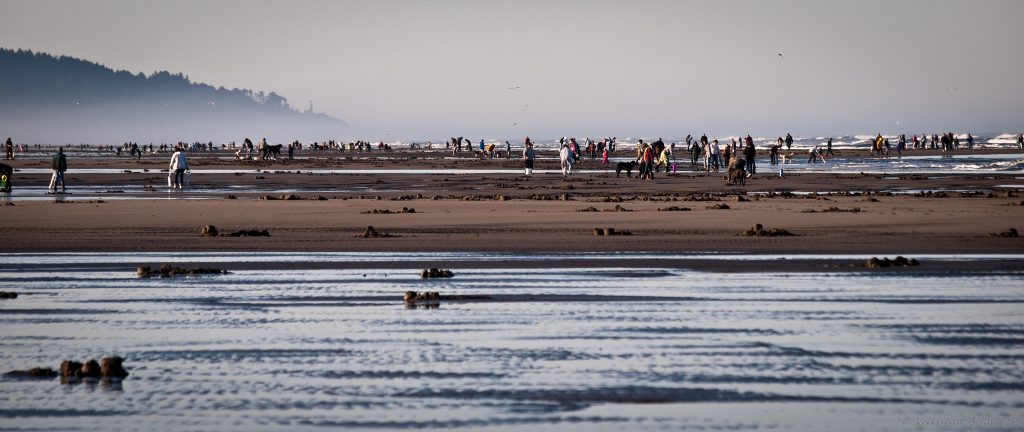
Each year along the Washington Coast, where the sandy shores meet the salty air, thousands flock to the beach for an event as old as humans living in the region. As tides recede in the fall, winter, and spring months, hearty Pacific Northwesterners brave the sometimes cold and rainy weather to get their limit of delicious mollusks. For many, razor clam digging is considered to be one of the quintessential Pacific Northwest activities, as it is fun, cheap, and a family-friendly activity that provides delicious meals and incredible memories.
Clam digging is something any age can participate in and is super easy to get started. All you need for a clamming adventure on the Pacific Coast of Washington is a permit, an implement to dig the clams out of the sand, and a container to put the clams in once you have found them. To make this even easier, we have compiled a handful of tips and important information to ensure that you’ll have a successful, safe, and legal clam dig along the Washington Coast.
When and Where to Go Clam Digging on the Washington Coast
It is not unusual to have as many as 1,000 people per mile digging up razor clams during a nice spring weekend day, so it is important to plan ahead. There are a handful of areas that are typically open to the public for clamming digging each year, from Olympic National Park’s Kalaloch Beach, to the mouth of the Columbia River.
While clam digging enthusiasts love to return to their favorite beach year after year, it is important to ensure that the beach you are planning to go to is open for clamming that day. Each season, beaches can open and close based on the health and population of the razor clams. A full list of open beaches, updated regularly can be found on the Department of Fish and Wildlife’s (WDFW) website. The website will also provide you with the upcoming clamming dates. Check this website often, as it can change at any time.
There are five regions of beaches for razor clam digging adventures, each possibly open and closed at any time for digging.
- The Long Beach region starts at the mouth of the Columbia River and heads north, all the way to the mouth of the Willapa Bay.
- The Twin Harbors region extends from Willapa Bay north to the south jetty at the mouth of Grays Harbor, found in Westport.
- The Copalis Beach region stretches from the north jetty at the mouth of Grays Harbor in Ocean Shores all the way north to the Copalis River.
- The Mocrocks region sits between the Copalis River as the south boundary and runs north until it reaches the boundary of the Quinault Indian Reservation.
- The Kalaloch region runs from the South Beach campground, all the way north to Olympic National Park’s Beach Trail 3. Keep in mind that this beach is nearly always to harvest.
Once you have found a beach to dig your razor clams, it is important to check the weather and tides. Clamming season usually occurs in the fall and winter when the ideal tides occur in the evenings. Spring clamming digs typically have better weather than during the fall/winter, but this is when the crowds are larger.
For the best bet at getting your limit, be prepared to go out in the fall and winter and deal with the elements, when there are not as many clam diggers on the beach. For the best tide information, check with NOAA or the Washington Department of Fish and Wildlife websites. The lower the tide, the better the digging will be.
What to Bring to Dig Razor Clams
Without a permit, you can’t dig for clams. All diggers 15-years of age or older are required to have a current license to harvest razor clams on any open beach. Digging cannot be done on closed beaches, even with a permit. You can choose a license based on how long you plan on going clamming this season, whether you want a three-day razor clam license or an annual combination clamming and fishing license. These licenses are available on WDFW’s website and from license vendors found all around the state.
Once you have your permit, remember that each clam digger is allowed to take up to 15 razor clams per day. It is important to note that you are legally required to keep the first 15 razor clams you dig, no matter the size or condition, and that each digger must keep their clams in their own container. Violators of these rules will be fined.
Once you have your permit, you’ll need to be properly dressed for your clam digging excursion. The fall and winter clam digging season has the best tides in the early mornings and night, meaning that you stand a good chance to be cold and wet. We recommend, at the minimum, having a sturdy pair of rubber boots, rain pants, a warm hat and a rain jacket, as well as a lantern or headlamp. You can always layer in case the weather gets nicer, but assume it will be wet and cold, as this is the Washington Coast in the darker months.
Razor clam diggers have two options for getting a clam out of the sand. You can choose between a shovel or a clam “gun.” The shovel is straightforward and requires a bit of patience and practice before you can dig a razor clam with ease. The clam gun is a metal or PVC tube that you twist into the ground and pull out the sand all around the clam. Most beginners tend to use a clam gun for the ease and simplicity.
A guide to use both tools can be found on the WDFW website, complete with graphs and a video. Remember to also have a container for every clam digger in your group.
The key to a successful clam dig is to start digging before the low tide hits. By starting early, you can follow the tide out, looking for signs of clam activity. The ideal time to find clams are when they are “necking,” their necks are sticking out of the sand.
However, more often you will have to look for the following three signs of clams:
- A dimple, which is a depression in the sand.
- A doughnut, which has a small hole and raised sides.
- A keyhole, which usually occurs in drier sand and looks like an hourglass or hole.
Typically, the larger sized holes indicate the larger clams. Clams will also occasionally squirt sand and water out of the hole where they are located, so keep an eye out. Once you spot the signs of a clam, you will need to be speedy with your dig, as razor clams can be quite quick in soft, watery sand.
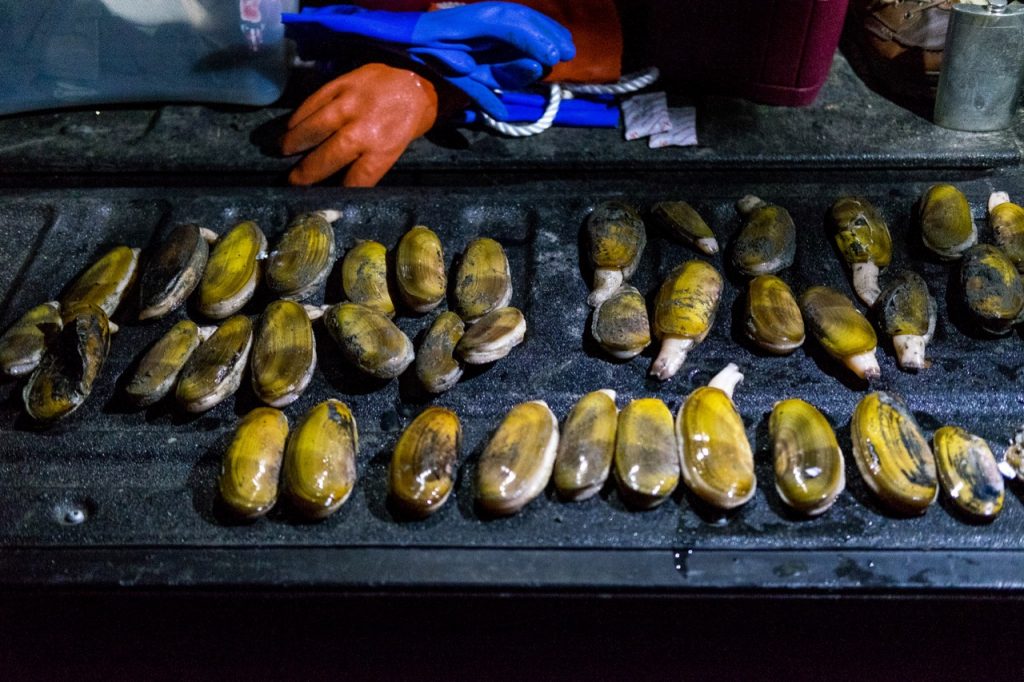
After successfully digging your clam, be careful grabbing it, as they are named for their razor-sharp shells. Carefully placing it in your container, continue until you have your limit of 15 clams per person, per day. Once you are home and your clams have been properly cleaned, there are some amazing razor clam recipes we strongly recommend! Cook one or try them all and fall in love with the deliciousness of fresh razor clams.
Safety
Clam digging is great fun for the family, but like most things in life, there are a few dangers of which you need to be aware. While out on the coast, make sure you are staying out of the surf, as rip tides or rip currents run along beach lines. These can be extremely dangerous for children and adults, and through rare, people will get swept off their feet, and pulled out to sea. Also, be aware of sneaker waves, which have also claimed the lives of clam diggers along the Washington Coast. The best way to stay safe is to never turn your back fully to the surf, as sneaker waves can appear at any time.
Where to Stay for Your Clam Digging Trip
Finally, no clam digging trip is complete without making a short vacation out of the adventure. For those on the North Beach, a stay at the community of Seabrook or a night or two at the Ocean Crest Resort will give you a fantastic sleep and incredible dining and coastal amenities. Those in the southern side of Grays Harbor will enjoy the easy access to the beach from the Ocean Spray Beach Resort or at The Breakers on the Long Beach Peninsula.
No matter where you stay along the coast, you’ll have an incredible time digging for razor clams, making memories with friends and family and rediscovering the beauty found along the Washington Coast.


